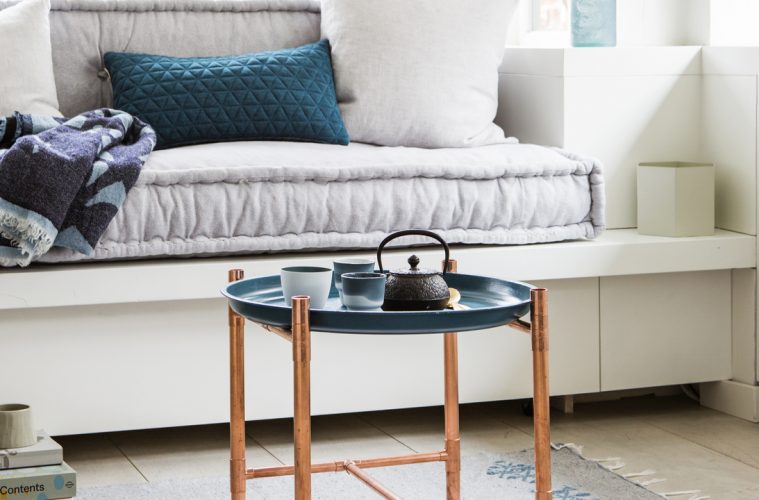
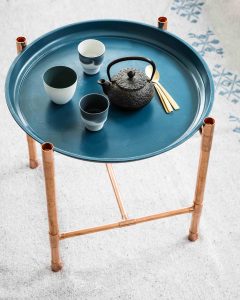
The hunt for the perfect coffee table is officially over! Build your own coffee table that is easily customizable and fits into small spaces.
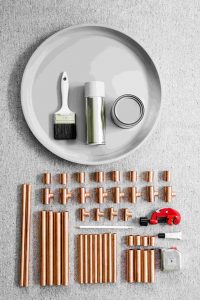
What you’ll need
- Round tray (we used a 45cm here)
- 2x 15mm copper tube (cut to 8×15,5cm; 2x 32cm)
- 2x copper tube 22mm (cut to: 4x 3cm; 4x 23cm; 4x 10cm)
- 8x red copper t-joint: 2x22mm X 1x15mm ends (A)
- 8x red copper socket 22mm (B)
- 4x red copper t-joint 3x15mm ends (C)
- Tube strong glue adhesive
Bart Brussee/Features & More
Tools
- Tube cutter
- ruler
- pencil
Paint and varnish
- Silk gloss paint in your choice of colour
- Clear lacquer spray paint especially for copper
- Flat brush with synthetic fibre
- Grey metal primer spray paint
Bart Brussee/Features & More
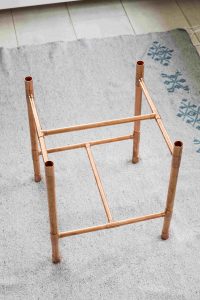
Putting together the copper coffee table base
- If you have a tray of diameter 45cm, use the measuring tape to measure the right distances of the copper tube as mentioned above. Cut to size with the tube cutter.
- First, put together the 4 legs with the 22mm copper tube. B + 10cm + A + 23cm + A + 3cm + B.
- Then put together the 4 connecting pieces in between the legs from a tube size 15mm (15,5cm + C + 15,5cm)
- Connect these 4 connecting joints with two 15mm copper tubes of 32cm
- Glue the connecting parts, the t-joints and the sockets together with the Bison max repair glue.
- Read the manual well before glueing. (Apply the glue only on one side)
- If you prefer to change the colour of the tray (as done in the picture), spray paint the tray with a metal primer, then paint (with spray paint or a brush) the tray in the preferred colour.
Bart Brussee/Features & More
Tip:
To give the copper its ultimate shine, it can be polished with Brasso copper polish.
Or alternatively, to keep the shine, degrease the copper tubes and paint the tubes and joints with a special
copper lacquer.
Did you build your own coffee table using our tips? Show us on Instagram at @sagardenandhome!
READ MORE: 15 MINUTE MAKEOVERS
Credits:
Concept & styling: Humade / Gieke van Lon en Lotte Dekker
Production for Features & More
Photography: Bart Brussee/Features & More/MAGAZINEFEATURES.CO.ZA