Imagine: your home is filled with the wonderful aroma of that brand new expensive candle you were gifted (or that we convinced you to buy, because who doesn’t love a good candle); your nostrils and your mood are content, joyous even.
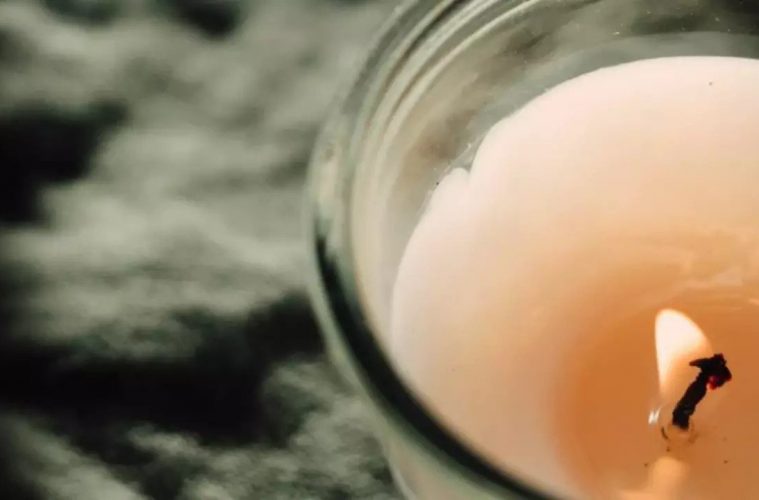
But as you come back to look at the beautiful waxen pillar of joy, you find every candle lover’s nightmare: your candle has started to tunnel. The wick is surrounded by a thick wall of wax that will never melt and release its scented bliss, and the tunnel will only deepen with time – and it will become impossible to get your hand in to light it, too.
You get the picture, but fret no longer – there are many ways to prevent or fix the tunnel of waxen horror.
How to burn your candle (yes, there’s a wrong way)

Via homesickcandles
Burning your candle correctly is as important as making a candle correctly – it can make or break the experience of your newest, fragrant purchase. Candles are carefully created to burn for a particular amount of time, so you need to follow the instructions upon first lighting it.
Here are some tips on how to burn it to prevent tunneling:
- Burn for 3 to 4 hours the first time
- Burn long enough for the entire top layer of wax to evenly melt the first time
- Burn it away from any breezes that might disturb the flame
- Make sure your wick is in the centre before letting the wax cool down again afterwards
- Trim the wick after every burn
How to fix tunneling

Via housebeautiful.com
1. Hair dryer
In the early stages of tunneling, you can use a hair dryer to stop it from getting worse. Turn the hair dryer on its lowest setting to avoid splashing wax or damaging furniture. Hold it over the top of the candle until the hardened wax on the top layer has evenly melted.
2. Oven
This also works in the early stages of a wax tunnel. Put the grill function on its lowest setting and leave the candle inside until it melts evenly to the level you desire. (The grill function will only melt the top).
3. Trim your wax
You can also use the end of a utensil to cut into the wall of unmelted wax surrounding the wick. Level the wax as evenly as you can. This is best when the tunnel is too deep for the above methods.
4. Tinfoil
If your candle keeps tunneling, tinfoil can help. Heat up the edge of the candle while it’s burning – you want the edges to become liquid. Wrap the foil around the top of your candle, and fold it slightly at the top so that it makes a hole in the centre. This is where the flame’s heat will escape. Do this multiple times, and eventually the wax will even out.
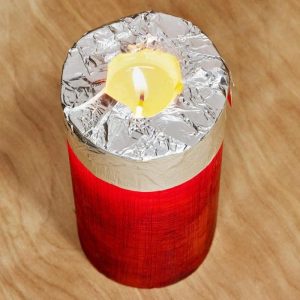
Via theamilyhandyman.com
5. Make wax melts
If you have a seriously tunneled old candle, you may as well save the fragrant wax and make wax melts. Put the candle (in its glass container) on a saucepan filled with hot water. Place this on the stove on low heat. The wax will melt, and when it’s entirely liquid, pour it gently into silicone moulds. You can choose whatever shape you like and keep them around for the aroma, or even add your own wick to them.
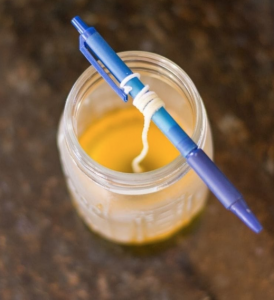
6. Replace the wick
This is the most difficult option, and the last resort. The trick is knowing which wick is right. Follow the candle manufacturers guidelines if there are any. Otherwise, do some research on which wicks best suit the type of wax in the candle.
Once you’ve found the best one, cut it to the right length. It will need to be 2 cm above the top of the wax, but cut it with a few centimetres extra (this will make sense in a moment). Melt the candle in a pot of water on low heat on the stove – like you would do to make wax melts. When the wax is entirely liquid, take out the old wick, and put the new one in. Do this by tying it to a pencil, stick or skewer (with the extra length you left), and lay it across the glass container so that the wick can hang in the centre of the wax until it dries. Once dry, you can cut the wick to 1 or 2 cm above the wick.
Via Brittany Goldwyn
READ MORE: The only French candle you need in your home and where to find it
The only French candle you need in your home and where to find it
READ MORE: DIY: How to make your own twisted candles