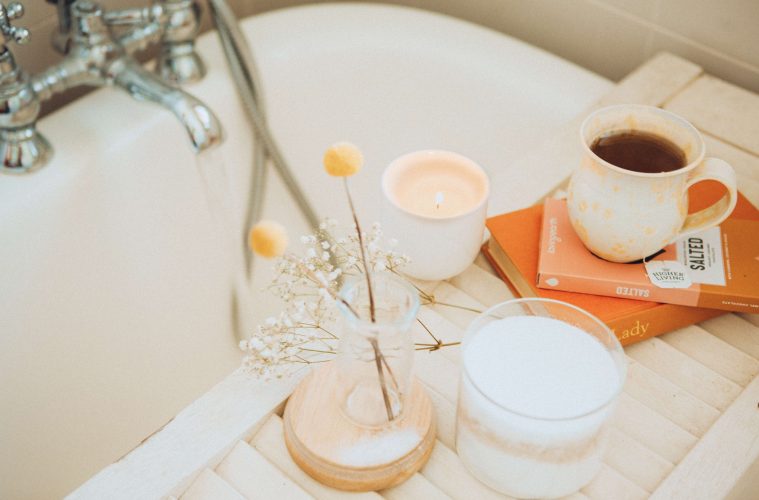
Need an excuse to schedule in more hot soaks and relaxation time? This project is both functional and a great decor element for your bathroom – grab your tape measure and let’s get started!
Time to complete: +/- 2 hours
Tools needed:
- Jigsaw with wood jigsaw blade
- Orbital sander with 100 grit sanding paper disc
- Power drill
Materials needed:
- Tape measure, speed square, and pencil
- Wood stain, clear water-resistant polyurethane sealer and paintbrush
- 10 mm wood drill bit
- 38 mm spade drill bit
- Waterproof wood glue
- 2x tea light candles (35 – 38 mm in diameter)
- Medium spreader clamps
Cutting list:
- Offcut piece 1 x 22 mm x 220 mm x 700 mm (depending on the width of your bath)
- Offcut from 2 x 22 mm x 44 mm x 320 mm
View this post on Instagram
How to DIY a bath tray:
Using an orbital sander with 100 grit sanding disc, sand down the wood pieces until the edges and surfaces are smooth and wipe off excess sawdust.
Measure the placements of the candles in the top two corners by drawing a square 50 mm in size from the edge and draw diagonal lines of each corner that cross in the centre to mark out the drill point. Measure and mark the centre of the 2 x 22 mm x 44 mm x 320 mm board, measure and mark the centre of the 1 × 22 mm x 220 mm x 700 mm board, line up the centres and measure and mark a 30 mm spacing between the two 22 mm x 44 mm x 320 mm length pine pieces.
Remember that the one 22 mm x 44 mm x 320 mm board lays flat on its 22 mm side, and the other spaced 30 mm under that one pine wood piece lays flat on its 44 mm side. Measure 100 mm from the right-hand side of the 22 mm x 220 mm x 700 mm board, then draw a line that is 200 mm in length vertically and that is 10 mm in width – this fits the wine glass stem. Side note: Be sure to customise this slot width size, as wine glass stems vary in thickness.
Insert the 38 mm spade drill bit into the power drill and place the tip onto the centre of the two squares on the two corners of the 22 mm x 220 mm x 700 mm board. Hold the drill firmly and perpendicular and drill until the spade drill bit drills a hole into the pine wood that is about 3 to 5 mm in depth.
Insert the 10 mm wood drill bit into the drill and drill a hole at the top edge of the 10 mm x 200 mm marked-out wine glass stem slot.
Then take a jigsaw and cut out the two lines to the top of that drilled hole to remove that section of pine wood. Sand any rough-cut edges. Wipe away excess sawdust.
Use a wood stain/paint colour of your choice to decorate the wood. Apply with a paintbrush or rag depending on the application instructions and allow to fully dry. Apply 1 to 2 coats, and allow for drying time between coats.
Now that all the wood pieces are covered, we can use the waterproof wood glue and glue down the 2 x 22 mm x 44mm x 320 mm wood pieces into place as marked, using clamps to secure and allow the glue to dry. Use a spacer and place something (like an extra piece of wood) that is 30 mm in width between the two wood pieces as the glue dries.
Use a waterproof clear sealer and cover the entire bath tray using a paintbrush, following the product application instructions. A clear polyurethane was used in this project – to allow the sealer to fully dry and apply one to two coats. Once the second coat is dry, the bath tray is ready to use – relax in the tub and enjoy your new DIY project.
A version of this article was published in the Garden&Home July 2023 print magazine
Feature image: Unsplash