Make things Pinteresting and add energy to a room through texture, rich colour, and contrast. It’s a budget-friendly project that requires no power tools to get this striking Pim-worthy interior look.
TIME TO COMPLETE
+/- 1 to 2 days
TOOLS/MATERIALS NEEDED:
- Measuring tape and pencil
- Spirit level
- Masking tape
- Double-sided mounting tape (approx. 2x rolls)
- Mitre saw box and hand saw.
- Plascon can be used (in this project, the exclusive Easy Living Wall Master paint was applied in a matt finish) in the colour the ‘Subtle Night’ OR Matt wall paint, paint tinted in the colour ‘Subtle Night’ (by Plascon)
- Roller tray set, paintbrush, and drop sheet.
- Safety gear, gloves, and glasses
PINEWOOD MATERIALS:
- 17 × TP 8 × 44 × 3M pine cover strips (Code-TP8× 44 × 3.0 COV)
Cut list:
- 26 × 8 mm × 44 mm x 1 470 mm to fill full wall.
- 5 x 8 mm × 44 mm x 680 mm to fill above door.
HOW TO:
STEP 1:
Paint your chosen wall.
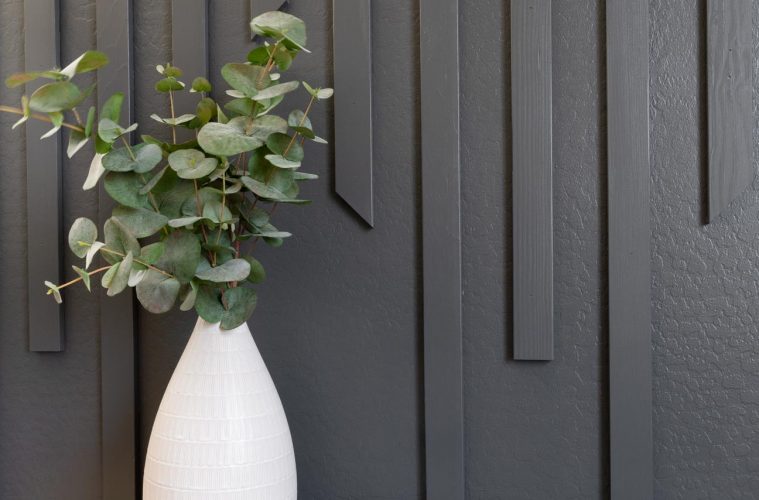
In a colour of your choice, paint your wall. A dark grey colour named ‘Subtle Night’ was used on this feature wall.
First use a paintbrush around the edges of the wall, skirting, and door frames (if present).
Then use a paint roller tray set and apply paint to the bigger surface area of the wall. Allow 1st coat to fully dry and then apply the 2nd coat, for full coverage.
While the first coat is drying, you may move on to the step to cut the pine cover strips to size, to save some time during this project.
STEP 2:
Cut the cover strips to size.
Measure the wall dimensions.
The wall in this DIY is 2.64 m high, and the look of this slat/ panel wall is an overlap in the centre of the wall. This overlap was calculated at 300 mm/ 30 cm. This makes the length of each slat to be cut at 1470 mm in length.
Wear the appropriate safety gear when using tools and make use of the hand saw and mitre box to make the woodcuts.
On the measurement mark of 1 470 mm, make a straight cut into the pine cover strip.
In this DIY, fill the wall measurements with enough slats, using a 1x cover strip as a ‘spacer’.
13 × TP 8 × 44 × 3M pine cover strips were cut to 26 x TP 8 × 44 × 1 470 mm.
For over the door in this space, it was calculated that 5 × TP 8 × 44 × 680 mm cut pine cover strips were required to complete the look.
STEP 3:
Placement of the cover strips.
Start from one side of the wall and work your way to the other side, Take one cut cover strip (1 470 mm in length) and place it on the edge of the wall, either from the floor/skirting to the wall, or from the wall down to the floor. In this DIY, the first cut slat or cover strip length was placed on the edge of the wall from the ceiling down.
Use a spirit level and pencil to make sure that the slat is straight and make light pencil marks on the wall, to help line up the slat for placement (this can be painted over later with a paintbrush).
Make use of a pine cover strip as a ‘spacer, to then mark out the placement of the following wood slat and so on.
Tip: Different wall measurements will require a different number of pine cover strips, and the lengths they need to be cut may vary and differ for this specific project.
STEP 4:
Adhere to the wall.
Once you have the straight pencil lines that are evenly spaced on the wall, use scissors to cut and use small sections of double-sided mounting tape. Place it on a sticky edge near the top of the slat section or cut a pine cover strip. Place another small section of the mounting tape in the middle and another section at the bottom end.
Take off the other paper to reveal the other sticky side of the mounting tape to adhere to the wall. Line up the cut cover strip or slat section with the straight pencil marks on the wall and once you are happy with the alignment, press firmly into position ‘sticking’ the pine slat/cover strip to the wall.
The next slats will be placed on the wall the same way, but this time alternate from the opposite direction, and then you will be able to see them.
‘Overlap 30 cm’ in the middle of the wall. Use the ‘spacer’ and continue along the wall until the wall is complete with all the cut slats.
DIY TIP: It would be easier to paint the wall first, then paint the slats once they are on the wall with a paintbrush.
STEP 5:
Paint the slats to match the wall paint.
Use a paintbrush and paint the slats along the wall in the same colour as the painted wall. Apply two coats and allow for drying time between coats.
Your DIY Modern Feature Slat Wall is now complete, using cheap materials and no power tools. This fun home decor project can be done over a weekend and will definitely keep you ‘smiling’ while DIY’ing.
A version of this article was originally published in the Garden&Home May 2023 printed magazine.
Feature image: Pixabay