
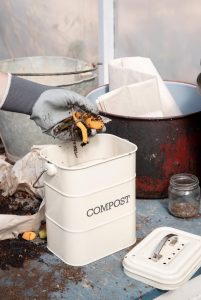
Don’t throw away your kitchen scraps or go off to buy fancy compost – make your own at home and produce solid or liquid gold for your garden.
Not the most glamorous of subjects perhaps, but as usual, it’s the groundwork that pays off in gardening. It is not necessarily about saving a few rands either, although that is certainly a factor, but more about the quality of the end product, which is compost, of course… The steamy, rotten smelly stuff that is going to ensure vigour and beauty in all that you grow. Many people think that making compost is complicated and mythical, that it smells bad or is a messy business, or that takes too long to be worth it. But that is not true – it is actually easy and quick to make your own compost. And it’s worth the effort, to ensure that your compost is organic and not loaded with pesticides and weed seeds, like many commercially available compost can be. The soil in many gardens, in particular urban gardens, is very often depleted of nutrients, so it doesn’t contain the macro and micro nutrients essential for healthy plant growth. And as more new housing developments are built, more and more homeowners try to start gardens from scratch in ground that is nothing more than a building site, full of cement and rubble – all that is horrible for your plants. This is where compost comes in. It can improve soil structure, and add all that much-needed bacteria and nutrients. Here’s a breakdown of the different types of compost you can make yourself.
A Traditional Compost Heap
Many of us probably have memories of forgotten corners of the garden, behind a shed somewhere out of the way, where fruit peels and kitchen scraps were tossed ad-lib and which became, especially in summer, a ghastly no-go area buzzing with fruit flies. Don’t panic – a compost heap can be much more efficient and user-friendly than that. Once you have decided on a corner of the garden, you can fence it off with latte panels, which are available from roadside vendors. This will help to keep it under control. If you have a small garden with no faraway corner to create a compost heap, purchase a plastic composter from your garden centre or hardware store. These are big enough to house enough material to keep a medium-sized garden in compost and are reasonably aesthetic.
THE MAINTENANCE
Ideally, you should turn the contents of the bin over at least once during its decomposition period to move all the micro-organisms around and aerate the heap. Almost any vegetable matter can go into the compost, from garden cuttings to kitchen scraps, but avoid meat products or you’ll end up with a rat invasion! Compost activators in powder or liquid form are available from garden centres – these are additives that you mix with the contents of your compost heap or bin to jump-start the whole decomposition process. A good combination of vegetable material will result in a well-balanced compost. In composting terms, this is often referred to as ‘browns’ and ‘greens’, the browns being dry material such as dead leaves and sticks, and the greens being wet material such as food scraps, leaves and lawn clippings. Greens contain nitrogen, while browns contain more carbon – try to incorporate both of these elements.
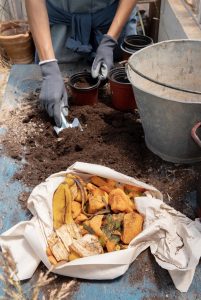
The major difference between making traditional compost and making bokashi is that with bokashi, your waste material is fermented quickly using special and specific types of bacteria. The bacteria is added in the form of a ‘starter’ or inoculant mixture, which breaks down organic matter extremely quickly. There are many good reasons to choose bokashi if you want to create your own plant food. You can use the solid fermented material as plant food or as a soil additive, or you can brew it into a compost tea. The real upside of bokashi compost is the speed at which the final product is ready – much faster than waiting for a traditional compost heap to rot down. Bokashi can be made in a small bucket on your kitchen counter if you’re short of space. If you follow the process properly, you’ll have the most amazing plant food with absolutely no smell. It can be made in any size bucket with an airtight lid, or in a special bokashi bucket (but this will probably cost you twice the price!).
DIY BOKASHI
You’ll need:
✣ 2 plastic buckets – any size, but one must fi t into the other and the bigger one must have an airtight lid
✣ Bokashi inoculant
✣ Food scraps
How to do it:
✣ Drill 20–30 holes through the base of the smaller bucket. Put the smaller bucket with the holes into the larger bucket.
✣ Place a layer of the food scraps on the bottom and cover with a layer of bokashi inoculant. Put the lid on the larger bucket. The bacteria in the inoculant will start fermenting the food scraps and the liquid produced in the process will drain through the holes.
✣ Add food scraps as you collect them. When the bucket is almost full, allow the contents to ferment
without opening it. Drain the liquid from the bottom every few days and use it on the garden as a
foliar feed. Dilute it 1:4 preferably as it can be quite concentrated.
✣ After 10 days, the food waste should be completely fermented and ready for use on your garden as a compost.
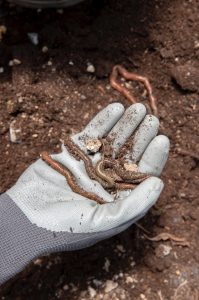
Vermicomposting or Worm Farming
Vermicompost is the product of a decomposition process using a specific species of earthworm, called red wigglers, to create decomposing vegetable waste called vermicompost. Theoretically you
can use any earthworm, but red wigglers have the ability to break down vegetable waste extremely fast. This form of composting has been around for decades and suddenly made a huge comeback about 12 years ago. Since then, gardeners have started their own worm farms and much has been
written about the benefits of the compost or castings, as well as the worm ‘tea’, the liquid produced by the worms as they chomp through the vegetable scraps. These worms are here to eat their way
through as much food as they can in order to break it down and excrete it, to produce solid and liquid gold. This compost has been shown to contain high levels of plant nutrients, particularly micro-nutrients, as well as minerals. This type of composting also provides you with an excellent
nutrient-rich organic fertiliser, and the worm tea is proven to be an effective natural fungicide when diluted down and sprayed on to your plants. The vermicompost can also help the soil hold water and prevent the spread of ‘bad’ micro-organisms, while increasing good micro-organisms in the soil.
HOW TO START YOUR WORM FARM
✣ Like bokashi composting, you can purchase an expensive, custom-made worm farm with tiers and taps, or you can save money and improvise with plastic containers that do the same job. Very successful and productive worm farms have been set up in old baths!
✣ Use two large plastic containers, preferably black, that can be stacked on top of each other.
✣ Drill several large holes through the base of the top container (this is for the worm tea to drain through), then set the container with the holes on top of the none drilled one.
✣ Place a layer of dry material, such as shredded newspaper or dry leaves, on the bottom. Add some water and mix together – the bedding should be the consistency of wet sponge.
✣ Add crushed egg shells, good-quality mushroom compost, kitchen scraps and your worms, and cover the container with black plastic or a black lid (worms do not like light).
LOVE YOUR WORMS
✣ Never feed worms meat scraps – they cannot break them down and they will attract unwanted attention.
✣ Worms battle to break down citrus and onions, so avoid these.
✣ Don’t be tempted to turn over the compost bed in the wormery until you wish to use it. You run the risk of damaging the worms.
✣ Worms are sensitive to temperature changes – put your wormery in a sheltered place in your garden that is out of direct sun and is not too cold and wet.
✣ Your wormery is going to attract many other creepy crawlies. No problem with these, just remove any slugs you find as they lay eggs in the vermicompost, which will end up in your garden.
✣ The worm castings are ready to use when the top of the compost ‘flattens out’ and the worms are getting through the scraps you feed them. One way of taking out some compost is to open the wormery for a short time. The worms will all migrate to the centre to escape the light, making it easy to take off the top layer of the compost with a spade without disturbing them.
ALSO SEE: HOW TO IMPROVE THE SOIL IN YOUR GARDEN